Computer,Handphone,Windows,Android,Linux,IOS,Blackberry

Dual Boot Ubuntu and Windows 7 | Fresh Mind Tech

Dual Boot Ubuntu and Windows 7 | Fresh Mind Tech


  • Windows 7 and Ubuntu, despite their opposing missions, can get along like best pals on a single computer. Here's how to set up a dual boot system that lets you enjoy the best of both worlds in perfect harmony.
    By default, Windows 7 takes over your boot-up process and wants to be your only OS, and Linux treats Windows like a weekend hobby you keep in a shed somewhere on your hard drive. But I've been dual-booting Ubuntu and some version of Windows 7 for nearly a year, and I've learned a lot about inconveniences, annoyances, and file-sharing necessities, and now I'll walk you through how to set up your systems to achieve a peaceful union of your dual-boot OSes. (Both with Windows 7 already installed, and with a clean system ready for a new dual-OS existence.)
    Follow through this guide, and I'll explain how to rebuild a system from the ground up with Windows 7 and Ubuntu, with either a backed-up and cleaned-out hard drive (recommended) or Windows 7 already installed. When we're done, you can work and play in either operating system, quickly and conveniently access your documents, music, pictures, and other files without worry or inconvenience, and boot into either system without having to worry about whether Windows is going to get mad at you. Plus, when Ubuntu 10.04 or Windows 8 come along, you'll find it much easier to install either one without having to start over entirely from scratch.

    What you'll need

    • Windows 7 installation disc: For clean installations, either a full installation copy or an upgrade disc is needed. If you own an upgrade disc but want to start from scratch, there's a way to do a clean install with an upgrade disc, though that's a rather gray-area route. Then again, there's probably not a person on this earth that doesn't have a licensed copy of XP or Vista somewhere in their past.
    • Ubuntu 9.10 installation image: You can grab an ISO at Ubuntu.com, or hit "Alternative download options" to reveal a (usually very fast) BitTorrent link. You'll want to get the ubuntu-9.10-desktop-i386.iso download for 32-bit systems, or ubuntu-9.10-desktop-amd64.iso.torrent for 64-bit on AMD or Intel systems (despite the name).
  • Blank CD or empty USB drive: You'll need one of these for burning the Ubuntu ISO, or loading it for USB boot. If you're going the thumb drive route, grab UNetBootin for Windows or Linux, plug in your USB drive, and load it with the downloaded ISO image.
  • All your data backed up: Even if you're pulling this off with Windows 7 already installed and your media and documents present, you'll want to have a fallback in case things go awry. Which they shouldn't, but, naturally, you never know.
  • Free time: I'd reckon it takes about 2 hours to pull off two OS installs on a clean system; more if you've got a lot of data to move around.

Setting up your hard drive

If you've got nothing installed on your system, or you've got your data backed up and you're ready to start from scratch, you're in a great position—skip down to the "Partition your system" section. If you've got Windows already installed, you can still make a spot for Ubuntu, though.
(Only) If Windows is already installed: You're going to "shrink" the partition that Windows 7 installed itself on. Before we do that, clean out any really unnecessary applications and data from your system (we like Revo Uninstaller for doing this). Also, open up "Computer" and take note of how much space remains on your main hard drive, presumably labeled "C:". Head to the Start menu, type "disk management" into the search box, and hit Enter.
Windows 7 probably put two partitions on your hard drive: one, about 100 MB in size, holding system restoration data. We don't want to touch it. Right-click on the bigger partition to the right, and choose Shrink Partition.

Dual-Boot Windows 7 and Ubuntu in Perfect HarmonyAfter a little bit of hard drive activity and a "Please wait" window, you'll get back the size you can shrink your Windows partition by.
Dual-Boot Windows 7 and Ubuntu in Perfect HarmonyIf the space Windows offers doesn't jibe with what your Computer view told you was "remaining," you might need to hit Cancel, then head back and defragment your hard drive, and take some of the steps laid out by the How-To Geek. Run the Disk Management tool again and try a Shrink Volume operation again, and free up as much space as you can.
Partition your system: You're aiming to set up a system with three partitions, or sections, to its hard drive: One lean partition for the Windows operating system and applications running from it, another just-big-enough partition for Ubuntu and its own applications, and then a much larger data partition that houses all the data you'll want access to from either one. Documents, music, pictures, application profiles—it all goes in another section I'll call "Storage" for this tutorial.
How do you get there? We're going to use GParted, the Linux-based uber-tool for all things hard drive. You could grab the Live CD if you felt like it, but since you've already downloaded an Ubuntu installer, you can simply boot a "live," no-risk session of Ubuntu from your CD or USB stick and run GParted from there. Once you're inside Ubuntu, head to the System menu in the upper left when you get to a desktop, then choose the Administration menu and GParted under it.

Dual-Boot Windows 7 and Ubuntu in Perfect HarmonyYou'll see your system's hard drive and its partitions laid out. You're going to create partitions for Linux and your storage space, but not Windows—we'll let the Windows installation carve out its own recovery partition and operating space. On my own system, I give Windows 15 GB of unallocated space, and Ubuntu another 15 GB of space right after it, with whatever's left kept as storage space. Then again, I've only got a 100 GB hard drive and don't run huge games or applications, so you can probably give your two operating systems a bit more space to grow.
Click on the unallocated space and hit the "New" button at the far left. In the "Free space preceding" section, click and hold the up button, or enter a number of megabytes, to leave space for Windows at the front. When you've got the "space preceding" set, set the actual size of the Ubuntu partition in the "New Size" section, and leave "Free space following" alone. Choose "unformatted" under file system—we'll let Ubuntu do the format itself and hit "Add." Back at the main GParted window, click on the space to the right of your two OS spaces, hit "New" again, and set the file system as "ntfs." Give it a label like "Storage," hit "Add," and at the main GParted window, hit the checkmark button to apply your changes. Once it's done, exit out of GParted and shut down the system from the pull-down menu in the upper-right corner.
If Windows is already installed: If you've shrunk down its partition for free space and booted into a live Ubuntu or GParted, click on the "Unallocated" piece next to the two "ntfs" partitions that represent your Windows 7 installation and system recovery tools. Create a 15(-ish) GB unformatted partition, and give it a label like Ubuntu. If you've got a good deal of space left, format it as "ntfs" and label it something like "Storage." If you can just barely fit the Ubuntu partition, you can just keep your media files in the Windows partition—until you can remedy this with a full wipe-and-install down the line.
Experienced Linux geeks might be wondering where the swap space is going—but don't worry, we'll create one, just not in its own partition.

Installing and configuring Windows

Grab your Windows 7 installation disc—either a full copy or modified upgrade disc, and insert it into your DVD drive. If your system isn't set up to boot from CD or DVD drive, look for the button to press at start-up for "Boot options" or something similar, or hit up your system maker's help guides to learn how to change your boot order in the BIOS settings.
Follow through the Windows 7 installation, being sure to choose "Custom" for the installation method and to point it at that unallocated space we created at the beginning of your hard disk, not the NTFS-formatted media/storage space we made earlier:

Dual-Boot Windows 7 and Ubuntu in Perfect HarmonyWork your way through the Windows 7 installation, all the way until you reach the Windows desktop. Feel free to set up whatever programs or apps you want, but what we really want to do is set up your Storage partition to house your pictures, music, video, and other files, and make your Libraries point to them.
Hit the Start menu, click Computer, and double-click on the hard drive named "Storage" (assuming you named it that earlier). In there, right-click and create new folders (or hit Ctrl+Shift+N) for the files you'll be using with both systems. I usually create folders labeled Documents, Music, Pictures, and Videos—I could also see folders for saved games and data files from big software packages. Copy your media files into these folders now, if you'd like, but we've got a bit more tweaking to pull off.
In the left-hand sidebar, you'll see your "Libraries" for documents, music, pictures, and video. At the moment, they point to your Public shared folders and the My Pictures-type folders on your main Windows drive. Click once on any of the Libraries, and at the top of the main panel, you'll see text stating that this library "Includes: 2 locations ...". Click the blue text on "2 locations," then click on each of the folders below and hit "Remove" on the right-hand side. Now hit "Add" and select the corresponding folder on your Storage drive. Do the same for all your music, pictures, videos, and other media folders.
Dual-Boot Windows 7 and Ubuntu in Perfect HarmonyWant to add another library for quick access? Right-click somewhere on the desktop, choose New->Library, and follow the steps.
That's about it for Windows. Now get your Ubuntu CD or USB stick ready and insert it in your system. Ignore whatever auto-play prompts appear, and restart your system.

Installing and configuring Ubuntu

Restart your computer, this time booting from your Ubuntu Live CD or USB boot drive. When your system boots up, choose your language, select "Try Ubuntu without any changes to your computer," and you'll boot into a "live" desktop, run entirely off the CD or USB stick. Once you're booted up, try connecting to the internet from the network icon in the upper-right—it helps during the installation process, ensures your network is working, and gives you something to do (Firefox) while the system installs.
Click the "Install" link on the desktop, and fill out the necessary language/location/keyboard info (most U.S. users can skip through the first 3 screens). When you hit the "Prepare disk space" section, select the "Specify partitions manually" option, then hit Forward. Select the free space that's after your first two Windows partitions with ntfs formats, then hit the "Add" button at bottom. Your partition should already be sized correctly, and the only thing to change is set "/" as a mount point. Here's what your screen should look like:
Dual-Boot Windows 7 and Ubuntu in Perfect HarmonyClick OK, then finish through with the Ubuntu installation. If it catches your Windows 7 installation, it might ask if you want to import settings from inside it—you can, if you'd like, but I usually skip this. Wait for the installation to finish, remove the CD or thumb drive, and reboot your system.
When you start up again, you'll see a list of OS options. The only ones you need concern yourself with are Windows 7 and the top-most Ubuntu line. You can prettify and fix up this screen,change its settings, and modify its order later on. For now, let's head into Ubuntu.


We're going to make the same kind of folder access change we did in Windows. Click up on the "Places" menu, choose "Home Folder," and check out the left-hand sidebar. It's full of links to Documents, Pictures, and the like, but they all point to locations inside your home folder, on the Linux drive that Windows can't read. Click once on any of those folders, then right-click and hit Remove.

Dual-Boot Windows 7 and Ubuntu in Perfect HarmonyYou should see your "Storage" partition in the left-hand sidebar, but without that name—more like "100GB filesystem." Double-click it, type in the administrator password you gave when installing, and you'll see your Documents, Music, etc. Click and drag those folders into the space where the other folders were, and now you'll have access to them from the "Places" menu, as well as any file explorer window you have open.
Ubuntu won't "mount," or make available, your Windows 7 and Storage drives on boot-up, however, and we at least want constant access to the Storage drive. To fix that, head to Software Sources in the System->Administration menu. From there go to Applications, then the Ubuntu Software Center at the bottom. Under the "Ubuntu Software" and "Updates" sections, add a check to the un-checked sources, like Restricted, Multiverse, Proposed, and Backports. Hit "Close," and agree to Reload your software sources.

Finally! Head to the Applications menu and pick the Ubuntu Software Center. In there, search for "ntfs-config," and double-click on the NTFS Configuration Tool that's the first result. Install it, then close the Software Center. If you've got the "Storage" or Windows 7 partitions mounted, head to any location in Places and then click the eject icon next to those drives in the left-hand sidebar. Now head to the System->Administration menu and pick the NTFS Configuration Tool.
You'll see a few partitions listed, likely as /dev/sda1/dev/sda2, and the like. If you only want your storage drive, it should be listed as /dev/sda3 or something similar—just not the first or second options. Check the box for "Add," click in the "Mount point" column to give it a name (Storage, perhaps?), and hit "Apply." Check both boxes on the next window to allow read/write access, and hit OK, and you're done. Now the drive with all your stuff is accessible to Windows and Linux at all times.

Adding swap to Ubuntu

"Swap" memory is a section of the hard drive that your system's memory spills over into when it gets full and busy. Until recently, I'd been creating a whole separate partition for it. Recently, though, I've found that swap isn't always necessary on systems with a large amount of memory, and that swap can simply be a file tucked away on your hard drive somewhere.
Follow the Ubuntu help wiki's instructions for adding more swap, but consider changing the location they suggest putting the swap file—/mnt/swap/ for the place your Storage is held—/media/Storage, in my case.
Reinforced UX303UB Zenbook laptop Intel Skylake Gallery

Reinforced UX303UB Zenbook laptop Intel Skylake Gallery

Taiwanese company, Asus, providing the latest supported laptop CPU Intel latest Skylake. The laptop dubbed ZenBook UX303UB.

"ZenBook UX303UB would become new ammunition from ASUS to stay ahead of the competition in the premium notebook market country," said Juliana Chen, Country Product Group Leader, ASUS Indonesia through its official statement.
Juliana added, UX303UB has an elegant design and powerful performance wrapped in a very slim design. ASUS ZenBook equipped with a landscape screen measuring 13.3 inches and has the technology (In Plane Switching) IPS Display.

"To be more spectacular, splendid ASUS helped add technology in the device that allows you to adjust and optimize the display image appears on the screen," says Juliana.

He further said, the performance reinforced Zenbook UX303UB latest generation Intel Core CPUs Skylake, namely i7 6500U and GPU from Nvidia GT940M with 2GB memory.

In addition, for added comfort and smoothness of operation, the ASUS Zenbook UX303UB equipped with a very large internal storage. ASUS Zenbook UX303UB have a HDD of 1 TB RAM 8GB DDR3L.

UX303UB Zenbook comes with a battery that is claimed to be capable of supporting up to seven hours of devices thanks to a feature called the Super Hybrid Engine II. "The technology is able to make Zenbook UX303UB active again within 2 seconds from sleep mode condition and able to save battery consumption by up to 25 percent," said Juliana.

a set price already includes a bonus gorgeous accessories such as notebook sleeve and LAN cable as a complete LAN dongle connector.

(ahl)
Samsung Tablet 12 inch with Windows 10 Certified

Samsung Tablet 12 inch with Windows 10 Certified


Earlier this year, Samsung had called working with a tablet that runs Windows 10 operating system with model number SM-W700. At that time, none of the 12 inch certainty that it will be marketed.

Reporting from Phone Arena, the device may be ready to enter the market in 2016. BC-W700 has been certified by the Bluetooth SIG and the Wi-Fi Alliance.

The tablet also confirmed correctly carry berbentang 12-inch screen in Zauba, export-import tracking website India. The device which had been sent to India to be tested.

The tablet will reportedly be priced at USD 455, or approximately USD 6 million. This suggests that the price of the handset is the most likely future high end products of this South Korean manufacturer.

Furthermore, SM-W700 runs with an Intel Core processor and the S Pen. This handset will be revealed next month.
Microsoft Launches 4G LTE Tablet

Microsoft Launches 4G LTE Tablet


After releasing the Lumia 950 and 950 phones XL featuring Quad HD screen flagship 5.7, Microsoft will launch 4G LTE tablet connected.

Reported by Neowin, according to reports WindowsBlogItalia, Chinese producers Sunty World officially launched a new tablet that runs Windows 10 operating system.

Specifications This tablet has a 7 and an 8-inch IPS LCD with a resolution of 1,280 x 800 pixels. The kitchen was redone supported chipset Qualcomm Snapdragon 210 (MSM8909), quad-core processor paired with a RAM of 1 GB / 2 GB.

On line fotogarafi 2 MP main camera, front-facing camera of 0.3 MP, comes with an internal storage of 8 GB / 16 GB which can be expanded with microSD up to 32 GB.

Problem connectivity, Microsoft's new tablet filmed already integrated with connectivity features 4G LTE (Long Term Evolution), Bluetooth / Wi-Fi, USB 2.0, and a battery life of 2800 mAh.

This device is available before the end of this month, with a choice of gray, blue, pink. Regarding the details of price and availability in the market, companies are still reluctant to disclose it, and are expected to be present in the country in the near future.

(kem)
Google Apps Promote Popular iOS and Android in the Home Page

Google Apps Promote Popular iOS and Android in the Home Page


Google, the giant search engine under the auspices Alphabet, featuring simple page. Apparently, Google utilizes it to promote its application.

As reported by Ubergizmo, under the Google logo, a search box and a few buttons there are the words, "Unwrap the best of Google for Android and iOS". In the article "Android" and "iOS" when clicked will take you into the new page.

The new page that allows you to see a list of applications designed for Android and iOS. Interestingly, Google currently provides as many as 62 applications for iOS, but it is a serious rival OS Android.

A total of 62 applications available for IOS ranging from applications like Gmail to the specific application for webmasters and content creators YouTube.
How to turn off the Windows Update feature in Windows 10

How to turn off the Windows Update feature in Windows 10

The latest operating system from Microsoft this seems to be an operating system that needs little dikulik in order to enjoy it. Because, for general users, Windows 10 will update automatically without informing in advance.


Luckily for you who have unlimited connections, well what if you are an Internet user with the quota system? Certainly in the blink your quota will be exhausted, especially as this case, which secretly Windows 10 takes quotas 6GB without the knowledge of users. Well this time, we will discuss together how to turn off this feature of Windows Update.

First, go to the Control Panel menu on the windows start menu, or simply typing "control panel" in the search section.


Upon entry to the Control Panel, select System and Security and click on Administrative Tools.


In the Administrative Tools window, we will be faced with many choices, select the Services by clicking 2 times.


Once entered into the Services menu, browse down to the bottom, looking for the name of the Windows Update service. Then click 2 times on the option Windows Update and click stop. In the Startup Type, select to Disabled and wait a few seconds.


Congratulations, you've Windows 10 will not run the automatic update feature. Please note that this feature only stop the update of the operating system Windows 10 only, not including updates of anti-virus or other programs.

If you want to reactivate it, the process is the same, only on a select part of Startup Type to Automatic and restart your computer.


How to Increase Battery Life of Windows 10

How to Increase Battery Life of Windows 10

Not long ago Microsoft officially launched its latest operating system Windows 10. Many improvements and changes brought by Windows 10, but if one of us was having problems on the notebook battery after upgrading to Windows 10? Here are some tips that may help to meningefisienkan battery usage on Windows 10.


The role of software is critical to the efficiency of use of a battery in a device. Moreover devices such as notebooks that have qualified hardware, so that the energy required is not little. Here, the role of software in managing power consumption required hardware. Windows 10 itself has introduced some features to mengefisiensi battery usage to make it more economical.

Here are some tips to save battery life on Windows 10.

Battery Saver

Battery Saver is a new feature that is present in the Windows 10 operating system which can help you to conserve power on the notebook. You can use your new feature this by going to Settings> System> Battery Saver and you will see the level of battery usage on your device.


Setting, Battery

If you choose open 'Battery Use' will appear details about what components using high power. In this section you can regulate and restrict what services as desired.

Select the link Change background app you can adjust the settings and applications that are running in the background. You can disable applications that run with the panel shifts the mode to "Off" on each application. The applications running in the background can drain your battery power for when not in use, the application remains active to give notification or update information and so forth.
Background-Apps


then select Change Battery saver settings, in the settings you can choose when the power saver is activated automatically, the default settings are usually at a rate of 20% but you can set this level to suit your needs. Give tick on Lower screen brightness while in battery saver and do not give a tick on Allow push notification. You can also menambakan any application that wants to always run in the background with the option "Add an app".
Battery Saver setting

Windows 10 Power & Sleep

The next option is under the battery saver, namely Power & Sleep Another feature to conserve battery life on a notebook.
Power & Sleep


You can configure the notebook screen when you die and in a state of sleep or sleep, while using the battery. You can mengoprek these settings to suit your prefensi respectively.

For setting the power option you can choose the link Additional power settings to settings that will bring the same settings battery with the battery setting in previous Windows versions. In the settings you have probably accustomed to regulate it.


Power Setting
Power Setting

Then the following simple tips to optimize your notebook battery on Windows 10:

     The first is, adjust the screen brightness. Make sure you have set the screen brightness level when using the notebook battery on setting Battery Saver and Power and Sleep.

 
     Turn off the communication services, you can increase the level of your battery life by turning off all communications services such as Wi-Fi, Bluetooth, and others. You can turn off all communication services to enable Airplane Mode / Airplane Mode to toggle out while clicking the notification icon.

Mode pesawat
Airplane mode

     Do not use heavy applications such as gaming, editing with Photoshop, or watch a movie with a high level of rendering. You can run heavy programs when connecting your notebook to the charger.
     Use dark colors for the look of your device, these tips are always advised to conserve battery life. Because basically when the screen displays bright colors such as white, red, and others, tinggkat power usage when using wallpaper to increase rather than black. You can use the theme of black and dark colored wallpaper.
Pilih tema warna gelap
Saving or not the battery in a device does have a lot of other factors, it may be that the quality of the battery has decreased or indeed the overuse heavy program, which certainly requires a lot of power.

Use the Battery Saver feature, and Power & Sleep combined with simple tips above. The above tips may help increase the battery life of your current Windows device 10 is not connected to a charger. A few tips for conserving battery power in devices that use the operating system Windows 10, may be useful for you.
4 Ways to Detect Virus Infected Computer

4 Ways to Detect Virus Infected Computer

Internet is easier for users to communicate and carry out various activities. On the other hand, the Internet became a favorite place for the virtual dedemit to spread malware and infect hundreds of thousands of computers around the world.
Malicious programs (malware) is considered as the culprit of the most annoying for computer users. If your computer has been infected with malware, surely you already know how troublesome to clean the malicious program. If you have this, do not delay to immediately clean your PC from malware infections that do not do more damage or infect other computers.
Malware is a computer program that is designed to damage a computer hard drive and perform various other operations that are destructive. While the virus is one of the most popular computer malware. The virus is one of the most damaging types of malware. The damage range from eliminating the files on the computer to cause the computer to crash.
Well, how to recognize the infected computer malware? Here are four (4) that can be tried to anticipate further spread:
1. Use softwareOne of the easiest ways to detect virus-infected PC is to use the software. Thousands of anti-malware application is available on the Internet, both of which can be obtained free of charge or for a fee, such as MalwareBytes or Spybot Search & Destroy. There are also some antivirus tools that can scan for viruses simultaneously malware. The thing to remember is that you must regularly scan your PC regularly and it updated with the latest patches. If not, the possibility of malware detected more and more and will be more difficult to clean.
2. PC slowMalware is generally cause the system to be slow, either a network connection or speed using the application (or open / close the application). If your PC suddenly slows down, the first step to take is to defrag the hard drive, then add RAM (memory). If the PC is still too slow, the possibility of PCs infected with malware.
3. Emerging pop-upOne sign of PCs infected with malware is a pop-up. The emergence of pop-up pornography as a result of malware increasingly becoming a trend lately. If on your PC a pop-up unwanted (particularly that appear even if you do not open a browser), this being one of the signs that the PC has been infected with malware. Generally, pop-ups can not be removed in a standard fashion. In this case, the PC must be booted to the mode "Safe Mode". You also likely require anti-malware application that reliable to remove it.
4. Home page and or link changeIf the browser home page changes when you do not tamper add modifiers, most likely PCs infected with malware. The same thing applies when you are searching a topic in the search engines (Google, for example), then click on the link provided by Google and then you are directed to another link at random. If you look at the 'behavior' like this, your PC is likely infected with malware or viruses.
Microsoft  started to present Windows 10

Microsoft started to present Windows 10

Windows 10 has now officially begun can be obtained. And the good news, Indonesia has become one of the countries which are prioritized by the Microsoft. Even Indonesia became the fifth recipient of Windows 10. Other countries also have acquired Windows 10 include New Zealand, Australia and Singapore.
windows 10
Windows 10 launched by Microsoft is also a final version that has been through testing in a Windows program Insider. Microsoft CEO Andrew Diantoro Indonesia revealed that as many as 5 million people have participated in the program.

And as promised earlier, Windows 10 this can be obtained free of charge for users of Windows 7
Wifi Is Not Detected On The Laptop Windows 7

Wifi Is Not Detected On The Laptop Windows 7

on laptops / notebooks that use Windows 7 as the operating system is not really difficult, just sometimes trivial things like this can trouble us if the times when we need to rely on an internet connection with wifi internet network "without wires" that are essential for the purposes of a sudden, Naah to overcome the wifi network that would not be detected by Windows 7 laptop can listen to my explanation on this article.
To How To Overcome Wifi can not connect to the Internet on your laptop / notebook windows 7 you, here are some things you need to make sure before:
1. Being in the area Wifi Internet: Prior to first make sure the other check if you already are in a wifi area, of these factors usually occurs in a closed room that led to the wifi network was not able to get into your room.
2. Network Wifi Normal: If the wifi network in your area is normal, then the next you can check other factors that cause wifi internet is not detected on your laptop / notebook you.
If both of the above you have the normal checks and turns in the sense of being in the area adan wifi and wifi network conditions were normal, the following ways to overcome the wifi is not detected well in laptop windows 7:
1. Turn on the Wifi internet on your laptop, the way in Fn + F10 (for laptop axios), there is a Fn + F3 where every type of laptop has a different combination of an easy way to find out you click bebarengan button (Fn + symbol buttons signal / transmitter) and in several types such as toshiba laptop wifi indicator lights will illuminate indicating you have wifinya signal on / switch.
2. Furthermore, if you have not finished as well, but had to follow the way of the above then you can do this way, namely:
- Go to the control panel via Start >> Control Panel, then on the View By: you choose the large icon that looks like this
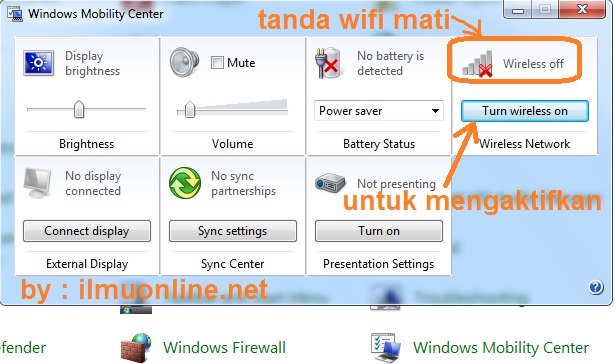
- select Windows Mobility Center, so it will look like this
wifi trouble pada laptop 450x261 Mengatasi Wifi Internet yang tidak terdeteksi di Laptop Windows 7- In the wirelles will look wirelless status "wifi" internet you, if the status "wireless off" means that your wifi is still active.
- Next you can activate your wifi by selecting the "Turn Wireless On"
cara mengatasi wifi yg trouble 450x266 Mengatasi Wifi Internet yang tidak terdeteksi di Laptop Windows 7- If you have, to see the results if it works or not just try to open a browser and try to access the internet.
"Magic Key" Windows on the Keyboard

"Magic Key" Windows on the Keyboard

Windows buttons shown on the keyboard rather than not have a function. In addition to functioning as a shortcut to the start menu, Windows key has several other functions like fast and CTRL ALT already known to many people.

Citing the Microsoft home page, there are some shortcuts that can be done using the Windows key. Ie according to its function as a shortcut, Windows key function makes it easier to interact with some of the existing programs.

As for some shortcut to the Windows key that can be applied, namely Windows + D, where shortcuts can help clean up an application or program that runs on the desktop and back to the desktop. Then, Windows + E is useful for opening Explorer, Windows + F is useful to search for files or folders.

Furthermore, Windows + M has the function of minimizing all windows, Windows + Down Arrow serves to minimize windows that are opened, Windows + Up Arrow Up Arrow function. If you are in a hurry and do not have time to lock the computer, you only need to press Windows + L.

Furthermore, Shift + Windows + M to undo all the minimize, Windows + Tab cycles there are functions for task bar button, and Windows + F1 to open the Help.
How To Automotically Log On To Windows Vista

How To Automotically Log On To Windows Vista

As long as security isn't a big concern, configuring Windows Vista to logon to your user account automatically can save you some serious time and effort when your computer is starting up.
Just follow the easy steps outlined below to make Windows Vista automatically logon to your user account. After completing these steps, Windows Vista will stop prompting you for a user name and password on startup!
Difficulty: Easy
Time Required: Configuring Windows Vista to auto login to a user account usually takes less than 5 minutes

Here's How:

1.      Click on Start, type the following command in the search box, and then hit the Enter key
This command will load the Advanced User Accounts Control Panel applet.
2.      In the Users tab, uncheck the box next toUsers must enter a user name and password to use this computer.
3.      Click on the Apply button at the bottom of the User Accounts window.
4.      When the Automatically Log On dialog box appears, enter your password in the two fields where it's asked and then click OK.
5.      Click OK on the User Accounts window to complete the process.
From now on, when your PC starts up, Windows Vista will log on automatically.


Back To Top